Climbing Wall
Two things I consider both my biggest strengths (and greatest weaknesses) are my (over)confidence in my ability to "figure things out" and my (naive) determination to see things through after I realize I've been too ambitious. So, in another episode of "Regina skips the baby steps and goes for the big project", I built a climbing wall with handmade climbing holds as my introduction to woodworking. I took on this project because I wanted to keep climbing when the gyms closed during the pandemic, but the benefits extended far beyond keeping my crimping game strong.
Read on to see how lots of tears led to learning new skills, feeling empowered, and completing my coolest project to date. Tips and write-up included!
Thoughts before the build
How steep will the wall be? And will you need a kickboard?
The steeper the wall, the shorter it will be (and the SWOLER you will get), but if your angle is steeper than ~40 degrees, I would recommend a kickboard so you don’t lose that climbing space near the ground
The steeper the wall, the shorter it will be (and the SWOLER you will get), but if your angle is steeper than ~40 degrees, I would recommend a kickboard so you don’t lose that climbing space near the ground
Will it be adjustable?
I don’t think you really have to change the design too much to make it adjustable or not. For me, it was just a little bit more effort to make it adjustable (using carriage bolts for certain connections rather than simply screwing wood together).
I don’t think you really have to change the design too much to make it adjustable or not. For me, it was just a little bit more effort to make it adjustable (using carriage bolts for certain connections rather than simply screwing wood together).
Will it be free-standing?
This one is easy. Make it free-standing if you don’t want to dig holes and pour concrete or if there is any possibility you will need to move your wall.
This one is easy. Make it free-standing if you don’t want to dig holes and pour concrete or if there is any possibility you will need to move your wall.
How tall will your wall be?
Plywood sheets are generally 4’x8’, and it seems like the majority of woodies either use two or three sheets at various degrees. You probably won’t build one tall enough to run into any zoning/permit issues, but might be worth a double check.
Plywood sheets are generally 4’x8’, and it seems like the majority of woodies either use two or three sheets at various degrees. You probably won’t build one tall enough to run into any zoning/permit issues, but might be worth a double check.
Bolted holds or screw ons?
Bolted holds means more work initially -- you need to drill in holes for many t-nuts and then screw in each t-nut. Aesthetically, this means your wall will be full of visible holes ( like most commercial climbing walls in the US). A huge benefit is that you’ll be able to move your holds around easily and quickly without power tools, and it seems like they’re stronger this way, too. If you plan on buying climbing holds, I think the options for bolt-on holds are better Screw-on holds are quite easy to place the first time -- you just screw them directly into the wall. Your wall won’t be littered in holes unless you move your holds around a lot. When you do want to move a hold, you will need a drill to do so. And, if you’re buying holds, the screw-on holds tend to be smaller
Bolted holds means more work initially -- you need to drill in holes for many t-nuts and then screw in each t-nut. Aesthetically, this means your wall will be full of visible holes ( like most commercial climbing walls in the US). A huge benefit is that you’ll be able to move your holds around easily and quickly without power tools, and it seems like they’re stronger this way, too. If you plan on buying climbing holds, I think the options for bolt-on holds are better Screw-on holds are quite easy to place the first time -- you just screw them directly into the wall. Your wall won’t be littered in holes unless you move your holds around a lot. When you do want to move a hold, you will need a drill to do so. And, if you’re buying holds, the screw-on holds tend to be smaller
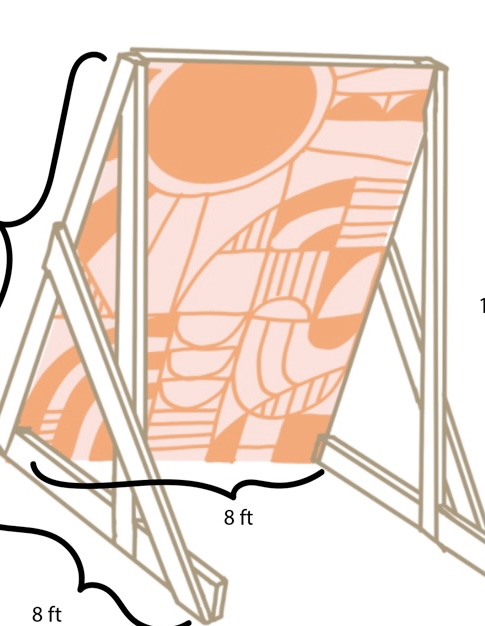
I chose to build a 12ft. high wall (because 8ft. did not seem tall enough) with screw-on holds (because I wanted to make my own, because I didn't want to screw in t-nuts, and because my budget did not include climbing holds). It is freestanding (because I am renting this house and would like my deposit back), adjustable (because I thought I didn’t want to commit to a single angle, but spoiler alert it’s been almost a year and I’ve kept it at 35 degrees since day 1), and does not have a kickboard.
Materials
Wood
12’ 2x4 pressure-treated ground contact
These make up the vertical supports of the frame. “Pressure-treated” means the wood has been treated to resist rot, decay, and termites. “Ground contact” is a type of treatment that means the wood can be placed on the ground with even more protection against rot and decay.
12’ 2x6
These make up the slanted supports that hold up the frame
8" 2x4
These make up the horizontal portions of the frame and supports
3/4" plywood
These make up the wall that attach to the frame. I used 3/4” ACX plywood. The “A” means one side is sanded, smooth, easily paintable, and defect-free (this is the side you climb on!), “C” means it’s has rougher patches and more knots. “X” means the plywood is good for outdoor use.
Tools
drill
driver
forstner bit
drill bits
screwdriver bit
saw / something to make cuts - I borrowed a circular saw, but you can also use a miter saw, hand saw, etc.
Hardware
3” wood screws
These are for screwing holds to the wall and for screwing the frame together. An alternative option for screwing the parts of the frame together is using joist hangers, which I saw in a lot of walls that used mostly horizontal frame beams
2” wood screws
These are for screwing the plywood to the frame
Galvanized steel carriage bolts
These are used to connect all members of the frame to each other. This is what makes the climbing wall adjustable — if I want to change the angle, I take out the bolt and stick it in a different location. If you don't want an adjustable wall, then you can use other forms of framing connectors like mending plates. “Galvanized steel” means the bolts have been treated with a protective coating to avoid rust and corrosion
Nuts
These are used to tighten the carriage bolts
Washers
These are used with the nuts and carriage bolts to help distribute the load from the nut
Other
waterproofing sealant, paint or stain paint roller rebar stakes (to stake the wall to the ground) tarp and cordollette (to cover the wall in inclement weather) crash pad (to appease my weak ankles)
Steps
Obtain Wood
I ordered my wood online from Home Depot (allow 2 weeks for delivery). However, after a mix-up on their side, I ended up having to pick up the wood myself. I rented a pick-up truck and would recommend doing the same if you don't have a large vehicle. Make sure you tie the wood down snugly with straps, and hang a red flag / fabric at off the back if the wood is sticking out
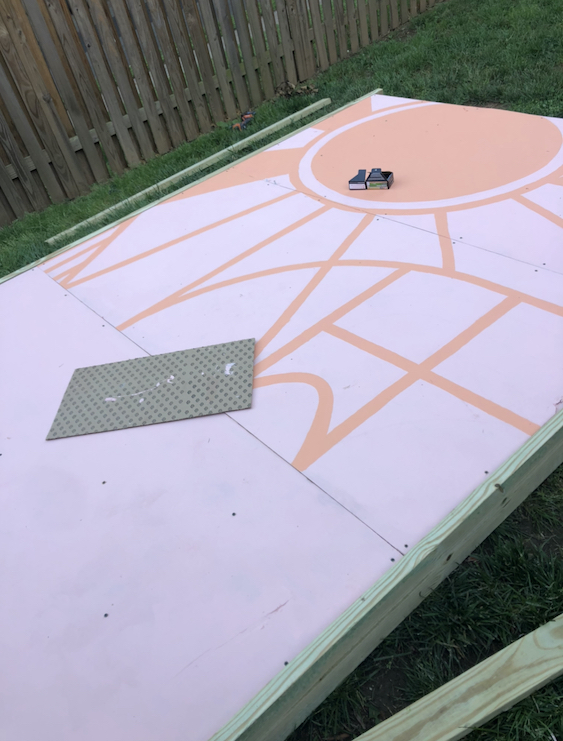
Paint Plywood
Sculpture was one of my favorite classes in college, and I thought of this wall as one large art project (which is also what I told my landlord when she asked me why there was a 12 ft. hazard in our backyard). I used Behr Ultra Exterior Paint & Primer (in Prairie Rose and Siren), and...
Waterproof Everything
I waterproofed all the wood and gave it time to dry. Make sure the ends of the wood get an especially nice coating because wood slips easily through it
Assemble Frame
I can't remember exactly what I did but I just screwed everything together in this fashion:
Screw Plywood to Frame
And then reconsider if you'd rather have a climbing wall or a dance floor platform
Recruit Friends to Barn Raise
note: I have seen people raise the frame and then screw on the plywood. I did not do this because 1. I knew I could get people to help raise the wall, and 2. I did not have a ladder and didn't want to mess with trying to screw that top piece of plywood onto the frame.
Secure Wall to Ground
Use those rebar stakes! We can get high winds here and I didn't want to risk having this wall topple over ruin any chances of getting our security deposit back
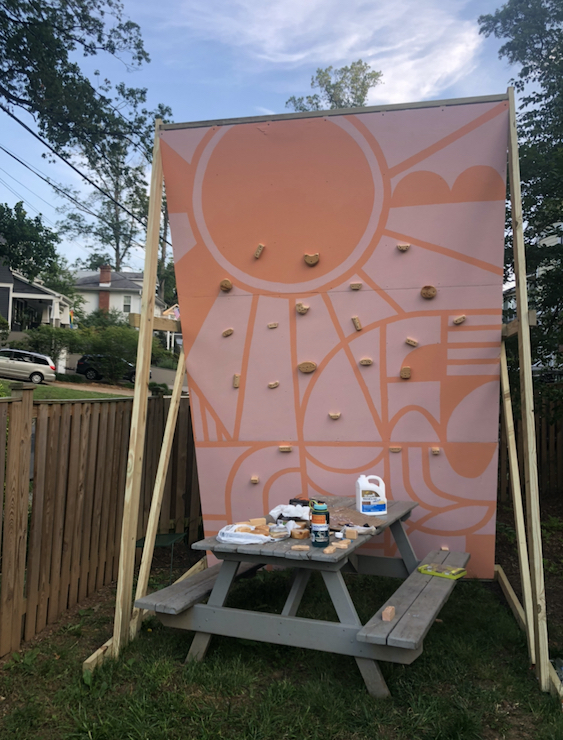
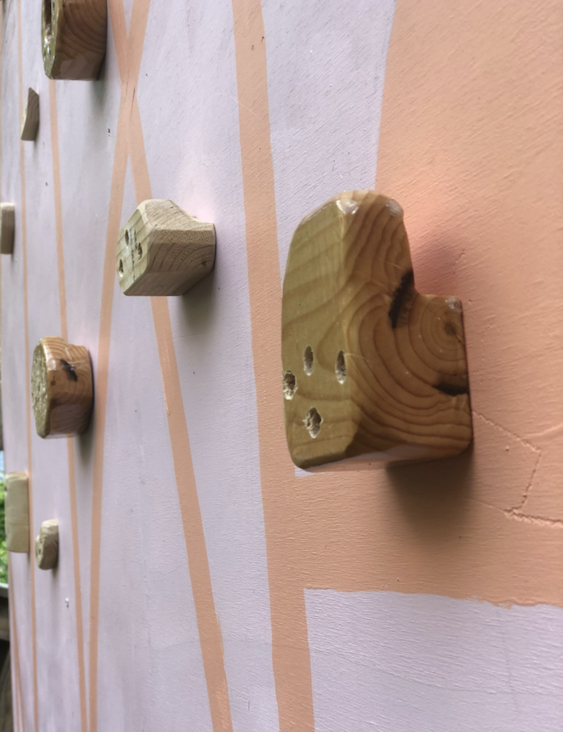
Screw on the climbing holds
If you are screwing them directly into the wall, think carefully about placement because the holes will be visible if you end up moving the climbing hold! Once that's done, it's time to...
Climb, baby, climb!
I ordered my wood online from Home Depot (allow 2 weeks for delivery). However, after a mix-up on their side, I ended up having to pick up the wood myself. I rented a pick-up truck and would recommend doing the same if you don't have a large vehicle. Make sure you tie the wood down snugly with straps, and hang a red flag / fabric at off the back if the wood is sticking out
Paint Plywood
Sculpture was one of my favorite classes in college, and I thought of this wall as one large art project (which is also what I told my landlord when she asked me why there was a 12 ft. hazard in our backyard). I used Behr Ultra Exterior Paint & Primer (in Prairie Rose and Siren), and...
Waterproof Everything
I waterproofed all the wood and gave it time to dry. Make sure the ends of the wood get an especially nice coating because wood slips easily through it
Assemble Frame
I can't remember exactly what I did but I just screwed everything together in this fashion:
Screw Plywood to Frame
And then reconsider if you'd rather have a climbing wall or a dance floor platform
Recruit Friends to Barn Raise
note: I have seen people raise the frame and then screw on the plywood. I did not do this because 1. I knew I could get people to help raise the wall, and 2. I did not have a ladder and didn't want to mess with trying to screw that top piece of plywood onto the frame.
Secure Wall to Ground
Use those rebar stakes! We can get high winds here and I didn't want to risk having this wall topple over ruin any chances of getting our security deposit back
Screw on the climbing holds
If you are screwing them directly into the wall, think carefully about placement because the holes will be visible if you end up moving the climbing hold! Once that's done, it's time to...
Climb, baby, climb!
Extra: Making your own climbing holds
I made my own climbing holds because:
• I didn't want to spend $300+ on new climbing holds
• All of the said climbing holds were out of stock when I was looking (turns out everyone was rushing to build a wall!)
• My local gym just happened to give away their retired holds 30 minutes before I called
• I really wanted my climbing wall to look nice, and I thought the wooden holds would add to the aesthetic
• Wooden holds are kind to your fingers (no flappers or blisters!)
• I liked the flexibility of choosing what kind of holds I wanted
• I wanted to be able to look at this wall and say, hey, I built every single part of this
Am I glad I made my own holds? Absolutely. Would I recommend it to others? Not necessarily — it took a very long time and, because they are all screw-on holds, I don't have the flexibility of changing the routesetting (unless I were OK with screw holes showing where holds used to be). I also noticed that my climbing shoes leave scuff marks on the holds (my fix is lightly sanding off the stains). Regardless, this is how I made my holds. I don't think this is the best way to make them, but they held up nicely over the year I had this wall.
Materials
scrap wood (I used scrap pine wood, but I think hardwood like alder, beech, etc. are stronger)
epoxy
Tools
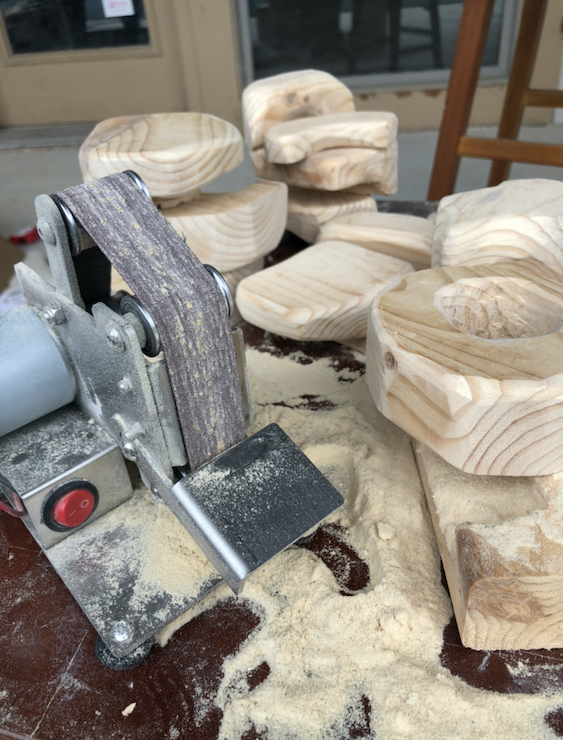
belt sander
rasp
sandpaper
drill + drill bits
2-in screws
saw / something to make general cuts
Process
• Cut general block shapes (make sure the grain of the hold is going parallel to the wall and not directly perpendicular into it)
• To make crimps / pinches / slopers: sand the block shapes
• To make jugs: use drill or rasp to either 1. drill and chisel 2. rasp. I did method 1 for most of the jugs before realizing method 2 is much better for smoother holds
• Epoxy the jugs (for extra strength so that the handle part of the jug doesn't break off. I did not epoxy the crimps / other holds because they seemed structurally solid)
• Drill pilot hole for the screws (so they don't splinter the wood)
• Drill countersink hole (so that the screws sit flat / inside the hold and don't scrape your hand)
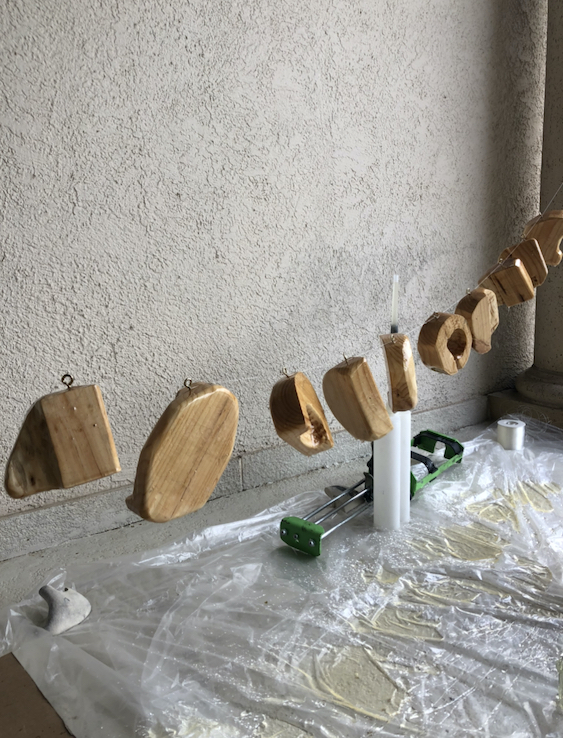
• Waterproof the non-epoxy holds (I used a clear waterproofing sealant. Not sure if this is necessary, but I wanted to protect them! This did not make the holds slippery)
• I didn't want to spend $300+ on new climbing holds
• All of the said climbing holds were out of stock when I was looking (turns out everyone was rushing to build a wall!)
• My local gym just happened to give away their retired holds 30 minutes before I called
• I really wanted my climbing wall to look nice, and I thought the wooden holds would add to the aesthetic
• Wooden holds are kind to your fingers (no flappers or blisters!)
• I liked the flexibility of choosing what kind of holds I wanted
• I wanted to be able to look at this wall and say, hey, I built every single part of this
Am I glad I made my own holds? Absolutely. Would I recommend it to others? Not necessarily — it took a very long time and, because they are all screw-on holds, I don't have the flexibility of changing the routesetting (unless I were OK with screw holes showing where holds used to be). I also noticed that my climbing shoes leave scuff marks on the holds (my fix is lightly sanding off the stains). Regardless, this is how I made my holds. I don't think this is the best way to make them, but they held up nicely over the year I had this wall.
Materials
scrap wood (I used scrap pine wood, but I think hardwood like alder, beech, etc. are stronger)
epoxy
Tools
belt sander
rasp
sandpaper
drill + drill bits
2-in screws
saw / something to make general cuts
Process
• Cut general block shapes (make sure the grain of the hold is going parallel to the wall and not directly perpendicular into it)
• To make crimps / pinches / slopers: sand the block shapes
• To make jugs: use drill or rasp to either 1. drill and chisel 2. rasp. I did method 1 for most of the jugs before realizing method 2 is much better for smoother holds
• Epoxy the jugs (for extra strength so that the handle part of the jug doesn't break off. I did not epoxy the crimps / other holds because they seemed structurally solid)
• Drill pilot hole for the screws (so they don't splinter the wood)
• Drill countersink hole (so that the screws sit flat / inside the hold and don't scrape your hand)
• Waterproof the non-epoxy holds (I used a clear waterproofing sealant. Not sure if this is necessary, but I wanted to protect them! This did not make the holds slippery)
Next Project
Printmaking